Use Playwright with Microsoft Dev Proxy on GitHub Actions
This post is over a year old, some of this information may be out of date.
Part of the process of testing the Microsoft Dev Proxy on GitHub Actions, was to use it in combination with Playwright. The advantage of this combination is that you can use the same mocked API responses which you use during development to test your solutions.
In this blog post, I will show you how to use Playwright in combination with the Microsoft Dev Proxy in your GitHub Actions workflow.
Things to know before you start
When creating tests, your goal is to aim to a desired outcome. The Dev Proxy can be used in various ways to simulate different scenarios. One of those is to simulate random errors (by using the GenericRandomErrorPlugin plugin), which can be useful during local development, but not when you want to run your end-to-end tests.
Best practice is to use the Dev Proxy for mocking APIs or simulating specific scenarios during end-to-end tests. This way, you can ensure that your tests are predictable and reliable.
Setting up Playwright
When you followed the Playwright getting started guide, you should have a basic setup in place. When you want to use Playwright with the Dev Proxy, you can add the proxy configuration to the configuration. You can do this in your playwright.config.ts file by adding the following code:
import { defineConfig } from '@playwright/test';export default defineConfig({ use: { proxy: { server: 'http://localhost:8000' } }});Configuring the GitHub Actions workflow
Once the configuration is in place, you can start configuring your GitHub Actions workflow.
Using a macOS runner
When using the macOS runner, you can start with the configuration found in the Using Microsoft Dev Proxy in your GitHub Actions workflow on a macOS hosted VM article. The only thing you need to add is the dependency installation steps.
name: macOS Dev Proxy with Playwright
on: push: branches: - main - dev workflow_dispatch:
jobs: test: timeout-minutes: 60 runs-on: macos-latest steps: - uses: actions/checkout@v4
- uses: actions/setup-node@v4 with: cache: "npm"
- name: Install dependencies run: npm ci
################################# # Cache + install of Playwright # ################################# - name: Store Playwright's Version run: | PLAYWRIGHT_VERSION=$(npm ls @playwright/test | grep @playwright | sed 's/.*@//') echo "Playwright's Version: $PLAYWRIGHT_VERSION" echo "PLAYWRIGHT_VERSION=$PLAYWRIGHT_VERSION" >> $GITHUB_ENV
- name: Cache Playwright Browsers for Playwright's Version id: cache-playwright uses: actions/cache@v4 with: path: ~/Library/Caches/ms-playwright key: playwright-${{ env.PLAYWRIGHT_VERSION }}
- name: Install Playwright Browsers if: steps.cache-playwright.outputs.cache-hit != 'true' run: npx playwright install --with-deps
################################ # Cache + install of Dev Proxy # ################################ - name: Store Dev Proxy's Version run: | DEVPROXY_VERSION=$(curl -s https://api.github.com/repos/microsoft/dev-proxy/releases/latest | jq .tag_name -r) echo "Dev Proxy's Version: $DEVPROXY_VERSION" echo "DEVPROXY_VERSION=$DEVPROXY_VERSION" >> $GITHUB_ENV
- name: Cache Dev Proxy id: cache-devproxy uses: actions/cache@v4 with: path: ./devproxy key: devproxy-${{ env.DEVPROXY_VERSION }}
- name: Install Dev Proxy if: steps.cache-devproxy.outputs.cache-hit != 'true' run: bash -c "$(curl -sL https://aka.ms/devproxy/setup.sh)"
####################### # Configure Dev Proxy # ####################### - name: Run Dev Proxy run: ./devproxy/devproxy &
- name: Install the Dev Proxy's certificate timeout-minutes: 1 run: | echo "Finding certificate..." security find-certificate -c "Dev Proxy CA" -a -p > dev-proxy-ca.pem
echo "Trusting certificate..." sudo security add-trusted-cert -d -r trustRoot -k /Library/Keychains/System.keychain dev-proxy-ca.pem echo "Certificate trusted."
########################## # Start Playwright tests # ########################## - name: Run Playwright tests run: npx playwright test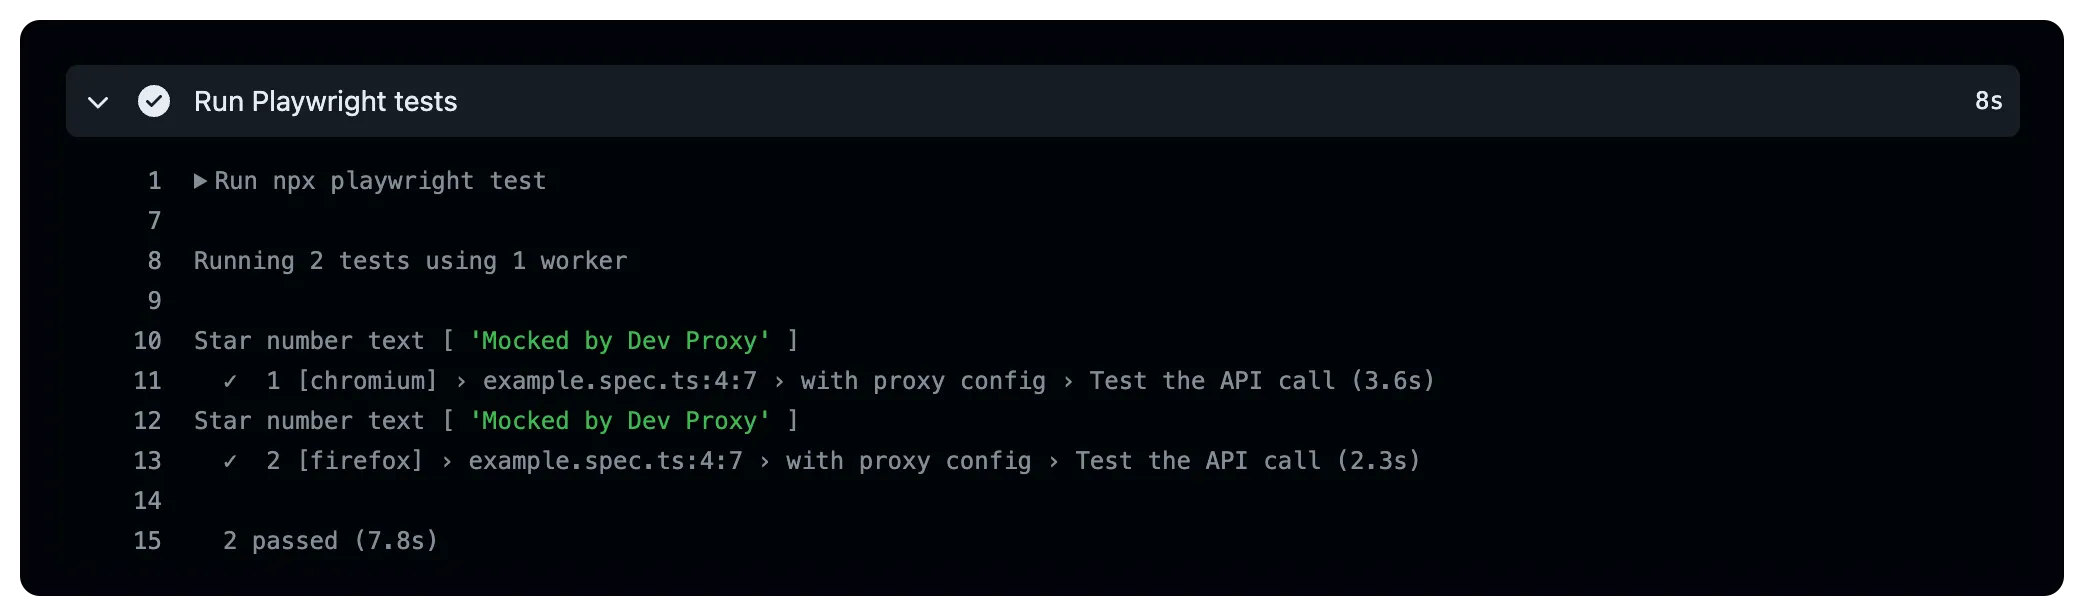
Using an Ubuntu runner
Things are a bit more complicated when you want to use the Dev Proxy with Playwright on an Ubuntu virtual machine/runner. The reason is the way browsers manage certificates on Linux. On macOS, all browsers use the certificates wich are trusted in the Keychain, but on Linux, each browser has its own certificate store which complicates things.
Chromium uses the NSS Shared DB to manage certificates.
Firefox does not have a central location where it looks for certificates. It will use the current profile or you can assign a policy template to manage certificates.
When using Firefox with Playwright, it creates an in-memory profile, so you cannot add the certificate to the profile before starting the browser. The policy approach is not yet supported by Playwright Playwright issue #28967. So, in case of using Firefox, you will have to ignore the HTTPS errors.
Ignoring HTTPS errors (the simple approach)
The simple approach is to ignore HTTPS errors by setting the ignoreHTTPSErrors to true in your Playwright configuration. You can do this for all browsers or for specific browsers. Here is an example of how you can do this:
import { defineConfig } from '@playwright/test';
export default defineConfig({ use: { proxy: { server: 'http://localhost:8000' }, // Ignore all for all browsers ignoreHTTPSErrors: true }, projects: [ { name: "firefox", use: { ...devices["Firefox Desktop"], // Ignore HTTPS errors for Firefox only ignoreHTTPSErrors: true }, }, ],});Adding the certificate to the NSS Shared DB
If you are only using Chromium in your tests, you can add the certificate to the Chromium NSS Shared DB.
To add the certificate to the NSS Shared DB, you can use the following steps:
- name: Install the Dev Proxy certificate for Chromium timeout-minutes: 1 run: | echo "Export the Dev Proxy's Root Certificate" openssl pkcs12 -in ~/.config/dev-proxy/rootCert.pfx -clcerts -nokeys -out dev-proxy-ca.crt -passin pass:""
# echo "Installing certutil" sudo apt install libnss3-tools
# echo "Adding certificate to the NSS database for Chromium" mkdir -p $HOME/.pki/nssdb certutil --empty-password -d $HOME/.pki/nssdb -N certutil -d sql:$HOME/.pki/nssdb -A -t "CT,," -n dev-proxy-ca.crt -i dev-proxy-ca.crt echo "Certificate trusted."The highlighted line in the code snippet above shows how you can add the dev-proxy-ca.crt certificate to the NSS Shared DB of Chromium. The CT,, trust arguments add the trusted for SSL client authentication.
Here is the complete GitHub Actions workflow for Ubuntu:
name: ubuntu Dev Proxy
on: push: branches: - main - dev workflow_dispatch:
jobs: test: timeout-minutes: 60 runs-on: ubuntu-latest steps: - uses: actions/checkout@v4
- uses: actions/setup-node@v4 with: cache: "npm"
- name: Install dependencies run: npm ci
################################# # Cache + install of Playwright # ################################# - name: Store Playwright's Version run: | PLAYWRIGHT_VERSION=$(npm ls @playwright/test | grep @playwright | sed 's/.*@//') echo "Playwright's Version: $PLAYWRIGHT_VERSION" echo "PLAYWRIGHT_VERSION=$PLAYWRIGHT_VERSION" >> $GITHUB_ENV
- name: Cache Playwright Browsers for Playwright's Version id: cache-playwright uses: actions/cache@v4 with: path: ~/.cache/ms-playwright key: playwright-ubuntu-${{ env.PLAYWRIGHT_VERSION }}
- name: Install Playwright Browsers if: steps.cache-playwright.outputs.cache-hit != 'true' run: npx playwright install --with-deps
################################ # Cache + install of Dev Proxy # ################################ - name: Store Dev Proxy's Version run: | DEVPROXY_VERSION=$(curl -s https://api.github.com/repos/microsoft/dev-proxy/releases/latest | jq .tag_name -r) echo "Dev Proxy's Version: $DEVPROXY_VERSION" echo "DEVPROXY_VERSION=$DEVPROXY_VERSION" >> $GITHUB_ENV
- name: Cache Dev Proxy id: cache-devproxy uses: actions/cache@v4 with: path: ./devproxy key: devproxy-ubuntu-${{ env.DEVPROXY_VERSION }}
- name: Install Dev Proxy if: steps.cache-devproxy.outputs.cache-hit != 'true' run: bash -c "$(curl -sL https://aka.ms/devproxy/setup.sh)"
####################### # Configure Dev Proxy # ####################### - name: Run Dev Proxy run: ./devproxy/devproxy &
- name: Install the Dev Proxy certificate for Chromium timeout-minutes: 1 run: | echo "Export the Dev Proxy's Root Certificate" openssl pkcs12 -in ~/.config/dev-proxy/rootCert.pfx -clcerts -nokeys -out dev-proxy-ca.crt -passin pass:""
# echo "Installing certutil" sudo apt install libnss3-tools
# echo "Adding certificate to the NSS database for Chromium" mkdir -p $HOME/.pki/nssdb certutil --empty-password -d $HOME/.pki/nssdb -N certutil -d sql:$HOME/.pki/nssdb -A -t "CT,," -n dev-proxy-ca.crt -i dev-proxy-ca.crt echo "Certificate trusted."
########################## # Start Playwright tests # ########################## - name: Run Playwright tests run: npx playwright test
Conclusion
Using Playwright in combination with the Microsoft Dev Proxy on GitHub Actions is possible, but as you can see it requires some additional steps when using an Ubuntu runner. The macOS runner is more straightforward to configure. Hopefully these configuration differences will change in the future, but for now I hope you can get started with the provided examples.
Related articles
Test the unexpected API results with Playwright mocking
Test unexpected API results with Playwright mocking: Simulate server issues, throttling, ... to make sure your application handles it as expected.
The Playwright Reporter for GitHub Actions
Learn how to use the @estruyf/github-actions-reporter to discern Playwright test results in GitHub Actions quickly.
Using Dev Proxy in your GitHub Actions workflow on macOS
Learn how to use Dev Proxy in a GitHub Actions workflow on macOS hosted VM for intercepting and inspecting your API calls
Report issues or make changes on GitHub
Found a typo or issue in this article? Visit the GitHub repository to make changes or submit a bug report.
Comments

Let's build together
Manage content in VS Code
Present from VS Code
Engage with your audience throughout the event lifecycle