Order List Items Like in a Meeting Workspace: Part 3
This post is over a year old, some of this information may be out of date.
In the previous parts I told you how you could enable the reorder functionality and create a custom reorder action in the ribbon. In this blog post I will cover how you could open the reorder page in a SharePoint dialog window.
Everywhere in SharePoint you got dialog windows. So it would be much cleaner to modify the custom action to also use a dialog box.
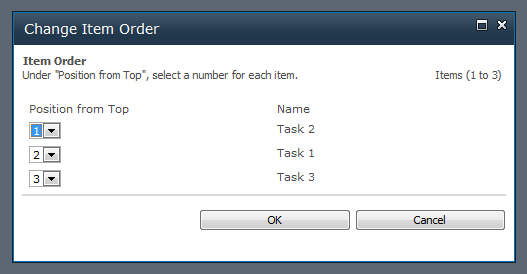
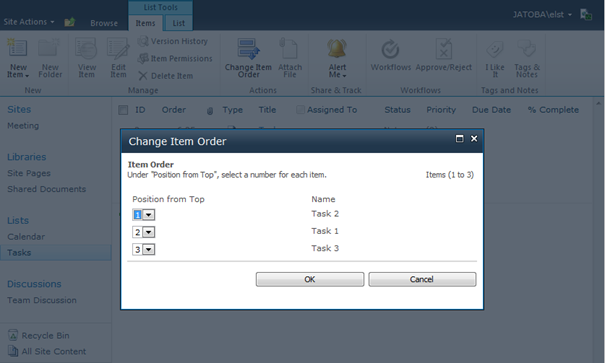
The final result looks like this:
Model Dialog (JavaScript)
You will need to use JavaScript to open a dialog box. This can be done by creating a call a function called showModalDialog. More information about this function can be found here: MSDN.
So what does this function need?
SP.UI.ModalDialog.showModalDialog(options)The option properties you will be using in this example are: url and dialogReturnValueCallback.
For the url property you could use the Navigate to URL value from the previous post.
~site/_layouts/Reorder.aspx?List={ListId}When working with a JavaScript call, the ~site token will not work. This needs to be replace with this: {SiteUrl}.
{SiteUrl}/_layouts/Reorder.aspx?List={ListId}With the dialogReturnValueCallback property you can create a callback function that executes after a completed form submission.
We are going to use this property to create a callback function that automatically refreshes the page when the form submission was ok. You could use the following function.
function(dialogResult, returnValue) { SP.UI.ModalDialog.RefreshPage(SP.UI.DialogResult.OK) }The whole block looks like this:
javascript:SP.UI.ModalDialog.showModalDialog({url:"{SiteUrl}/_layouts/Reorder.aspx?List={ListId}",dialogReturnValueCallback: function(dialogResult, returnValue) { SP.UI.ddModalDialog.RefreshPage(SP.UI.DialogResult.OK) }})Change Custom Action
The only thing that remains is to update your custom action that you created in Part 2.
- Open the custom action; {{< caption-new “/uploads/2011/12/120811_1811_OrderListIt2.png” “Custom Change Item Order Action” “data/jpeg;base64,iVBORw0KGgoAAAANSUhEUgAAAAoAAAAJCAIAAACExCpEAAAACXBIWXMAAA7EAAAOxAGVKw4bAAAA5ElEQVR4nE3CSW6DMBQAUN//QFUWXUTqkE6KgJpgMhCUYMCYIa2Hjx2wq0Zd9OmhD5xGaf4Sn1ekXiXsAdOnmK6zjhzrx7sFOhdFw3nDOW+ay2VQUpoRtFLOzekhRyXrokNFWzkaq2HUMMJotTbO+YRsEe+/QYO9TvMvdztfp8l7v0n36HiqaFkxxruu/9v2rOFCiJjsUMlaVtd9P6h/QIN3brs/oooPtChKWgophRBSSqmUBjDGkF2Gui+plZJCGhittf7GWgtaZfkJPb+HnzgJok2AkxCTEJMAJ8u38HUdLe6XP4PZ9npJ4fpbAAAAAElFTkSuQmCC” “483” “429” >}}
- Change the Navigate to URL property with your JavaScript block; {{< caption-new “/uploads/2011/12/120811_1811_OrderListIt3.png” “Update the Navigate to URL” “data/jpeg;base64,iVBORw0KGgoAAAANSUhEUgAAAAoAAAAECAIAAAA4WjmaAAAACXBIWXMAAA7EAAAOxAGVKw4bAAAAZ0lEQVR4nDWJwQrDMAzF8v8/1/NGSzfSJmuSZxPXYKen0cGE0EXhtb7jlkptRNwA3CUApdbeJYj0LUY0nH9ExMzcfYwrqGraMxO7DzP/afcal6qGwjo90yPS8jnn1Jcsc5b10Apm5i8Pcm+8/BxOiwAAAABJRU5ErkJggg==” “454” “192” >}}
- Click OK. Now you should have a custom action that opens a dialog box to the reorder page.
Related Posts
Related articles
Order List Items Like in a Meeting Workspace: Part 2
Quick Tip: Custom Action Tokens in SharePoint 2010 Designer
SharePoint Designer Workflow Action: Retrieve the File Extension
Report issues or make changes on GitHub
Found a typo or issue in this article? Visit the GitHub repository to make changes or submit a bug report.
Comments

Let's build together
Manage content in VS Code
Present from VS Code