Sandboxed To-Do List Web Part on Office 365 – SharePoint Online
This post is over a year old, some of this information may be out of date.
Today I received my Office 365 account, so I thought it would be cool to check out if my sandbox web part, that I have created some time ago, is working on SharePoint Online.
Here is the link to the original blog post: Creating a Sandboxed Visual Web Part from the To-do List
If you are the lucky owner of an Office 365 Beta account, you can follow the next steps to make use of my To-Do list web part.
Steps to make use of the web part
Resources
The first step is to set the resource quota for your SharePoint Online site.
- Open the Office 365 admin site;
- Click on “Manage” under the SharePoint Online section; {{< caption-new “/uploads/2011/04/042711_1727_SandboxedTo1.png” “Manage SharePoint Online” “data/jpeg;base64,iVBORw0KGgoAAAANSUhEUgAAAAoAAAAECAIAAAA4WjmaAAAACXBIWXMAAA7EAAAOxAGVKw4bAAAAY0lEQVR4nDWMQQ7DIAwE+f8je6oA29gBQzikjolo1ZV2DivNhnPOIlJra6q1KR/1Y7b+Cb1rTAmAAEvKkBGpMLMUFjML0vrrneMehZhFDiTKgOOc2x6Xx2F63Wu5+7cb/jt/AG5icg05584lAAAAAElFTkSuQmCC” “237” “90” >}}
- In the next window, click on “Manage site collections”; {{< caption-new “/uploads/2011/04/042711_1727_SandboxedTo2.png” “Manage Site Collections” “data/jpeg;base64,iVBORw0KGgoAAAANSUhEUgAAAAoAAAABCAIAAABol6gpAAAACXBIWXMAAA7EAAAOxAGVKw4bAAAAIklEQVR4nGN49+b1u9cvP7178/3bt+/ff3z7DgEgxo8fPwG3WByZYwDocAAAAABJRU5ErkJggg==” “605” “88” >}}
- Select the SharePoint Online site for which you want to set the resource quota;
- Click under the “Site Collections” tab on “Resource Usage Quota”; {{< caption-new “/uploads/2011/04/042711_1727_SandboxedTo3.png” “Resource Usage Quota” “data/jpeg;base64,iVBORw0KGgoAAAANSUhEUgAAAAoAAAAECAIAAAA4WjmaAAAACXBIWXMAAA7EAAAOxAGVKw4bAAAAcElEQVR4nBXCSxLCIAwAUO5/KBeOF/AAKp/SkEDSAl2BYRzfPHNdXUSYZYyx1lL9rv+pOlSnyeQgYRFOKY0x627xfePtIdu95afxIVjnKe4hhNYaInlnc6Zaz6s3w0c9zk7AgBmwvD7W+gjEEShR+QEcHm6jihPRSQAAAABJRU5ErkJggg==” “328” “119” >}}
- In the resources textbox you can specify the number of resources for your site. I have used 200 in this example, if you are finished, click on save. {{< caption-new “/uploads/2011/04/042711_1727_SandboxedTo4.png” “Number of Resources” “data/jpeg;base64,iVBORw0KGgoAAAANSUhEUgAAAAoAAAAICAIAAABPmPnhAAAACXBIWXMAAA7EAAAOxAGVKw4bAAAA2UlEQVR4nC2MwUrDQBRF51NFERfugoobF1VxV9rfcS8pQ1AC1tqUTIoBY4JNfNVm5r1500lJ8HA5u3vE+c04GE2C22kwmp5ePRxf3J8MO7u8O7oei+8GCNEMIKIdILKdd59gRLVpEI1utTaGmf2A877rumKL4qvaAEDbaiLCPoNEpLXxlgpAUf9sifomW+7N7Jxjdv/v96XKVf6h8jzrrVaZSlSaZHVRLbJSlFW9t2zRWkOoDdTNH/xCA3a3W5cgoni+XKWLJI1f355mMpRR9BKHMppJ+Rg+HwCc09C/8dd0jgAAAABJRU5ErkJggg==” “504” “396” >}}
Deploying the sandboxed solution
When you set the number of resources for your site, you can upload the sandboxed solution to the site. Here is the download link for the solution: To-Do List Web Part Solution File
- Go to your SharePoint Online site;
- Open the “Site Actions” menu, and click on “Site Settings”;
- Under the “Galleries” section, click on “Solutions”;
- On the “Solutions” tab click “Upload Solution”;
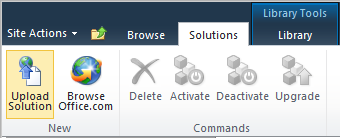
- When the solution is uploaded, you need to activate the solution by clicking on “Activate” in the modal dialog window. {{< caption-new “/uploads/2011/04/042711_1727_SandboxedTo6.png” “Activate User Solution” “data/jpeg;base64,iVBORw0KGgoAAAANSUhEUgAAAAoAAAAHCAIAAAC+zks0AAAACXBIWXMAAA7EAAAOxAGVKw4bAAAA0UlEQVR4nE3NPQ/BQBzH8XshJGI1GIgYLBIGEjGJwegFmSxMohsdDLwEi6WJSFsSIg3V89Reqw/3vzviYfDJd/htP1Sot9OlZqrYSJdbiVwtlqnEs9VvyXwNzRdKT5L7ktztdQajyXA8G46nkjyT5PdAhBDbtoGG3m0lBDz/CYGOR9M0TyfL0tSdqm51bbffHyyMLYyv1xtyicsYE4Kv9a2iaMvlxjDMh+cFvh8GAXLsN0LI3Qs4Fx/cefgGvpwdFwEApRQAIsa5+J0C435EI2AvciOotU2ZVwIAAAAASUVORK5CYII=” “605” “397” >}}
Using the web part
When you have uploaded and activated the sandboxed solution, you can make use of the web part.
- Go to the page where you want to use the web part;
- Edit the page, and on the “Insert” tab, click “More Web Parts”; {{< caption-new “/uploads/2011/04/042711_1727_SandboxedTo7.png” “Insert To-Do Web Part” “data/jpeg;base64,iVBORw0KGgoAAAANSUhEUgAAAAoAAAADCAIAAAAlXwkiAAAACXBIWXMAAA7EAAAOxAGVKw4bAAAAaElEQVR4nAFdAKL/ADxNYD1OWztNXjVIXk5UWNuaPfGtTYp4Wic+VzdIWADa4u3U4enJ2OHe5e3i6O7u8vb19vXn6/DX2NXX1rsA4ci34ci44sm44sm34ci24cm528Gv4Ma15suy5MSZnKA9PtsEymgAAAAASUVORK5CYII=” “524” “137” >}}
- In the “Filter By” select “E. Struyf”, select the “To-do Web Part”, and click “Add”; {{< caption-new “/uploads/2011/04/042711_1727_SandboxedTo8.png” “Selecting and Adding the To-Do List Web Part” “data/jpeg;base64,iVBORw0KGgoAAAANSUhEUgAAAAoAAAAECAIAAAA4WjmaAAAACXBIWXMAAA7EAAAOxAGVKw4bAAAAfUlEQVR4nGPIqu5OLWvpmbFkxuI1Uxasmrpg1ZT5K/tmLZ02f3nn7FUMdx+/ePPu/a8/f/78+w8B//79+/Hrz////19++sFw7e6jx89ePH7x5t7T13/+/Pn758+PX7/ffPz679+fp+++gqTvPXzy+/dvqF4w+PMXZNSLj98B+PNnkazLp/EAAAAASUVORK5CYII=” “605” “229” >}}
- Configure the web part and you are done.
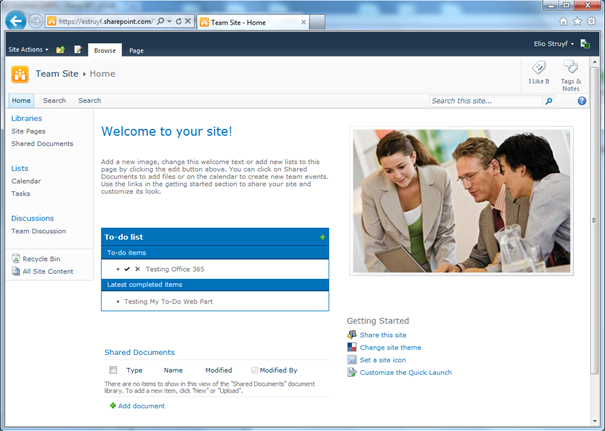
Result
Related articles
Creating a Sandboxed Visual Web Part from the To-do List
Create a New Document Using Office Web Apps
Task Status Manager With ECMAscript and jQuery UI
Report issues or make changes on GitHub
Found a typo or issue in this article? Visit the GitHub repository to make changes or submit a bug report.
Comments

Let's build together
Manage content in VS Code
Present from VS Code
Engage with your audience throughout the event lifecycle