Part 6: Create a Multi-Value Search Refiner Control
This post is over a year old, some of this information may be out of date.
This post focusses on the creation process for a multi-value search refiner control. This control will be very much the same as the default multi-value refiner, but has a bit more flexibility, and gives you a good starting point for applying your own customizations.
Default Multi-Value Refinement Control
First let me tell you how the default multi-value search refiner control works.
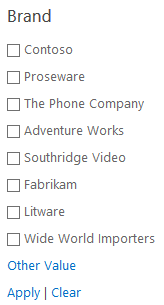
The default multi-value search refiner control uses checkboxes to set the multi-value refinement. When the refinement gets applied, it calls the Srch.Refinement.submitMultiRefinement method. This method retrieves all the checkboxes that are checked and it applies the refinement by calling the updateRefinementFilters method.
The problem / downside with the default multi-value search refiner control, is that the HTML mark-up of the refiner may not be altered (only small changes), otherwise the Srch.Refinement.submitMultiRefinement method will not function anymore. When this method tries to retrieve the checkbox elements, it does it by using a name attribute, and so when you want to apply modifications, you should keep this name attribute in place.
Custom Multi-Value Refinement Control
To give you more flexibility, I’ll explain how you could create your own multi-value search refiner control.
Note: I’ll make use of a light version from refiner control that was created in part 4 of this series: Light Custom Search Refiner Control.
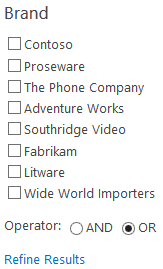
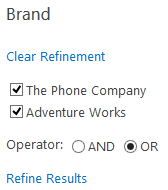
This will be the end result:
Creating Your Own Custom Multi-Value Refinement Control
The first thing to do is change the select element in the template to a DIV element, and to switch the option elements to checkboxes with their corresponding labels. For this you need to update the ShowRefiner function to this:
function ShowRefiner(refinementName, refinementCount, tokens, checked) { // Create the onClick event var elmId = "checkbox-" + refinementName;
// Check if the refinement contains results if (checked) {_#--> <div><input type="checkbox" value="_#= $htmlEncode(tokens) =#_" id="_#= elmId =#_" checked="checked"><label for="_#= elmId =#_">_#= $htmlEncode(refinementName) =#_</label></div><!--#_ } else {_#--> <div><input type="checkbox" value="_#= $htmlEncode(tokens) =#_" id="_#= elmId =#_"><label for="_#= elmId =#_">_#= $htmlEncode(refinementName) =#_</label></div><!--#_ }}A couple of things have changed in this function:
- This function uses new arguments: refiner name, refiner count, token value (instead of the refiner object), checked (Boolean);
- The token value is used instead of the refiner object. Only the refiner token value is needed because this values will be used to create an array with the selected refiners. The next step is to update the function calls to this:
if (selectedFilters.length > 0 '' hasAnyFiltertokens) { for (var i = 0; i < selectedFilters.length; i++) { var filter = selectedFilters[i]; if(!$isNull(filter)) { // The new function call is used ShowRefiner(filter.RefinementName, filter.RefinementCount, filter.RefinementTokens, true); } }}
if (unselectedFilters.length > 0) { for (var i = 0; i < unselectedFilters.length; i++) { var filter = unselectedFilters[i]; if(!$isNull(filter)) { // The new function call is used ShowRefiner(filter.RefinementName, filter.RefinementCount, filter.RefinementTokens, false); } }}In these loops, the refiner objects are removed and updated to use the refiner token values.
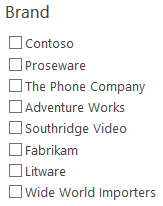
The current outcome looks like this:
Adding the Refinement Action
The next step is to add an element that will trigger the refinement action. Right now you can only check the checkboxes, so we’ll show a link underneath the checkboxes to do the refinement.
The following piece of code is added in place of the RemoveRefinement block.
<p><a href="javascript:{}" onclick="MultiRefinement.SubmitRefinement('_#= ctx.RefinementControl.propertyName =#_', $getClientControl(this));">Refine Results</a></p>This link uses an external function call, this function will be created in a separated JavaScript file. You can also place this function in your own JavaScript file, as long as it is available when you do the refinement action.
Note: you cannot place this function in the display template, because the template is only used to display data. If the function is defined in the display template, it cannot be called.
For this function two things are needed:
- The element needs to get a ID to easily retrieve it via JavaScript;
var elmId = ctx.RefinementControl.propertyName + '-MultiRefiner';_#--> <div id='_#= elmId =#_' class='ms-ref-unselSec' style='display:_#= $htmlEncode(displayStyle) =#_'>- A script reference needs to be added in the display template. This can be done with the $includeScript method (not needed if you have your own external JavaScript file already referenced);
<body> <script> $includeScript(this.url, "~sitecollection/_catalogs/masterpage/EStruyf/refinement-functions.js"); </script>This is the content of the external JavaScript file:
var MultiRefinement = MultiRefinement '' {};
MultiRefinement.SubmitRefinement = function (name, control) { // Get the Refiner Control Element from the page var refinerElm = document.getElementById(name + '-MultiRefiner'); if (refinerElm) { // Retrieve all the checkboxes from the control var checkboxElms = refinerElm.getElementsByTagName('input');
// Create a new array var refiners = [];
// Loop over each checkbox for (var i = 0; i < checkboxElms.length; i++) { var elm = checkboxElms[i]; // Check if the checkbox is checked if (elm.checked) { // Append the refiner value to the array Srch.U.appendArray(refiners, elm.value); } };
// Call the refinement method with the array of refiners control.updateRefinementFilters(name, refiners, "OR", false, null); }};What the code does, is it retrieves all the checkboxes from the control, and it loops over each to see if it is checked. When this is the case, the checkbox value will be added to the refinement array. At the end this refinement array will be used to call the updateRefinementFilters method, which will trigger the search refinement with your values.
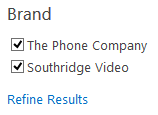
Now your refinement action will work, so you can test the multi-value refinement.
Add a Removal Action to the Refinement Control
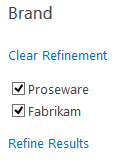
The next action that will be added to the control, is to get the ability to remove the whole refinement. This can be done like in the other parts. You’ll need to add a link to the template that updates the refinement control with a null reference.
if (selectedFilters.length > 0 '' hasAnyFiltertokens) {_#--> <p><a onclick="$getClientControl(this).updateRefinementFilters('_#= ctx.RefinementControl.propertyName =#_', null);" href="javascript:{}">Clear Refinement</a></p><!--#_This is the outcome:
Choose the Operation
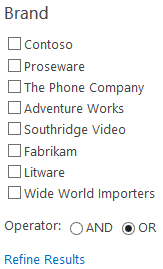
An idea I got to make this refiner a bit more unique, was to add the operation that you want to perform on the refinement, an AND or OR operation.
The first thing to do is creating a new function that will be used to create the radio buttons. This function will be called ShowOperatorRadioElements, and it will also allow to automatically check the operation in use. To know what type of operation is currently used, you’ll need to retrieve it from the current Query State. This can be easily done by the following code:
var currentRefinementCategory = ctx.ClientControl.getCurrentRefinementCategory(ctx.RefinementControl.propertyName);The object that it returns looks like this:

In the output above, you can see that the operation can be retrieved from that object. The ShowOperatorRadioElements function looks like this:
function ShowOperatorRadioElements() { // Retrieve the intial set of refinement var currentRefinementCategory = ctx.ClientControl.getCurrentRefinementCategory(ctx.RefinementControl.propertyName); var operator = !$isNull(currentRefinementCategory) ? currentRefinementCategory.o : 'OR';
// Create operator name and operation IDs var operatorName = ctx.RefinementControl.propertyName + '-Operator'; var andID = ctx.RefinementControl.propertyName + '-and'; var orID = ctx.RefinementControl.propertyName + '-or';
if (operator === 'OR') {_#--> <input id="_#= andID =#_" type="radio" name="_#= operatorName =#_" value="AND"><label for="_#= andID =#_">AND</label> <input id="_#= orID =#_" type="radio" name="_#= operatorName =#_" value="OR" checked="checked"><label for="_#= orID =#_">OR</label><!--#_ } else {_#--> <input id="_#= andID =#_" type="radio" name="_#= operatorName =#_" value="AND" checked="checked"><label for="_#= andID =#_">AND</label> <input id="_#= orID =#_" type="radio" name="_#= operatorName =#_" value="OR"><label for="_#= orID =#_">OR</label><!--#_ }}The following piece of code can be added just before the Refine Results link. This will show the Operation text, and calls the ShowOperatorRadioElements function.
<p> Operator:<!--#_ ShowOperatorRadioElements();_#--></p>One last thing, to support this operation to take place, you’ll need to do an update to the SubmitRefinement function so that it retrieves the dropdown value and use it for the refinement.
MultiRefinement.SubmitRefinement = function (name, control) { // Get the Refiner Control Element from the page var refinerElm = document.getElementById(name + '-MultiRefiner'); if (refinerElm) { // Retrieve all the checkboxes from the control var checkboxElms = refinerElm.getElementsByTagName('input'); // Retrieve the operator dropdown element var operatorElm = document.getElementsByName(name + '-Operator'); // Get the checked operator value var operator = 'OR'; for (var i=0; i < operatorElm.length; i++) { var elm = operatorElm[i] if (elm.checked) { operator = elm.value; } }
// Create a new array var refiners = []; // Loop over each checkbox for (var i = 0; i < checkboxElms.length; i++) { var elm = checkboxElms[i]; // Check if the checkbox is checked if (elm.checked) { // Append the refiner value to the array Srch.U.appendArray(refiners, elm.value); } };
// Call the refinement method with the array of refiners control.updateRefinementFilters(name, refiners, operator, false, null); }};The final result looks like this:
Download
You can download the files on GitHub: Part 6 files.
Changes
05/12/2013
Updated the code to retrieve the operator value. This could be simplified by using the getCurrentRefinementCategory method.
Blog posts in this series:
- Part 1: Create your first search refiner control template
- Part 2: Adding Refinement Actions to the Custom Search Refiner Control
- Part 3: Working with File Types in the Search Refiner Control Template
- Part 4: Create a dropdown refiner control
- Part 5: The Search Refiner Control Methods Explained
- Part 6: Create a Multi-Value Search Refiner Control
- Part 7: Working with Ranges in the Search Refiner Control
Related articles
Part 1: Create Your First Search Refiner Control Template
Part 2: Adding Refinement Actions to the Custom Search Refiner Control
Part 3: Working with File Types in the Search Refiner Control Template
Report issues or make changes on GitHub
Found a typo or issue in this article? Visit the GitHub repository to make changes or submit a bug report.
Comments
Let's build together
Manage content in VS Code
Present from VS Code
Engage with your audience throughout the event lifecycle
