Localization of Visual Studio Code Extensions
This post is over a year old, some of this information may be out of date.
Welcome to another blog post where we explore the world of Visual Studio Code extensions! In this article, I will delve into localizing your extensions. Localization allows you to make your extension accessible to users around the globe by providing translations in different languages. As some things were unclear to me when I wanted to start localizing one of my extensions, I wrote this article to help others in the same situation.
Tips for testing out your localization
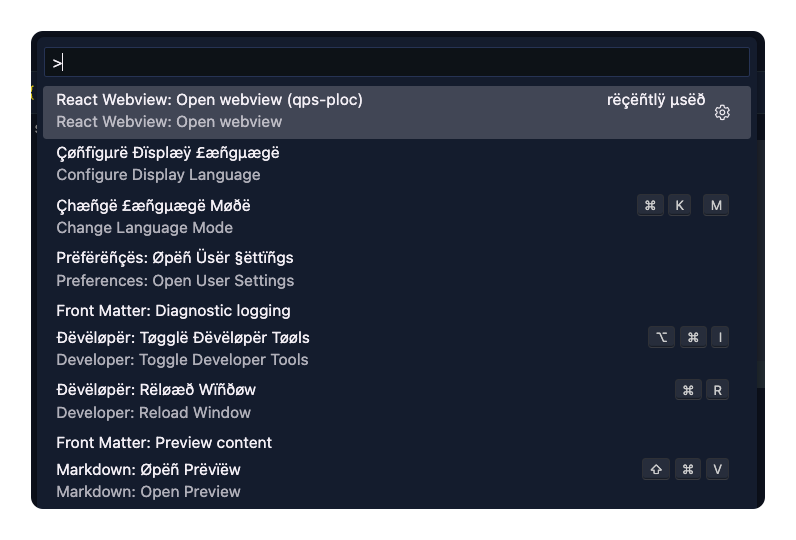
When you want to start localizing your extension, you first need to know which languages Visual Studio Code supports. On the diplay language documentation page from Visual Studio Code, you can find all available locales and how you can install them for your editor.
While testing your localization, the Pseudo Language Language Pack extension will help you. It will update the display language of your editor to Unicode characters, which makes the interface still readable, but it will also help you to spot issues with your localization.
Localizing the commands and settings in your package.json file
To begin with, localizing your extension, we will start with the commands and settings in your package.json file of your extension. To add localization support, we need to use a package.nls.json and package.nls.<locale>.json files. These files hold the translations for the commands and settings in your package.json file.
As an example, I will use the following command definition:
{ "contributes": { "commands": [{ "command": "vscode-react-webview-starter.openWebview", "title": "Open the webview", "category": "React Webview" }] }}To localize this command, we first create the package.nls.json file in the root of our extension. This file holds the default language value for our extension (English).
{ "command.openWebview": "Open the webview"}Next, we create the package.nls.<locale>.json file in the root of our extension. I will make a package.nls.qps-ploc.json file for the pseudo-language in my example.
{ "command.openWebview": "ₒₚₑₙ ₜₕₑ 𝓌ₑᵦᵥᵢₑ𝓌"}Within the package.json file, you must update the command title with the localization key. To let Visual Studio Code know that you want to use the localization key, you will have to wrap the key with a % sign.
{ "contributes": { "commands": [{ "command": "vscode-react-webview-starter.openWebview", "title": "%command.openWebview%", "category": "React Webview" }] }}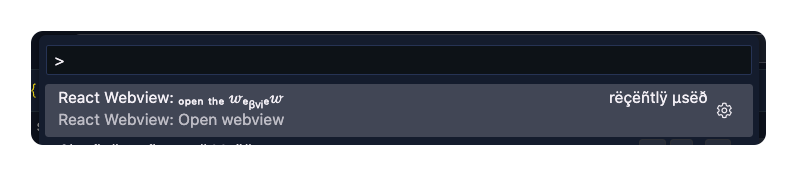
Localizing the strings used in your source files
Let’s explore how to localize the strings used in your TypeScript files. Previously, the vscode-nls and vscode-nls-dev packages were used for localization. However, a new way of marking strings as “needing translation” has been introduced through the vscode.l10n.t API, which has been part of the official VS Code API since version 1.73.
To start, all you need to do is to wrap your strings with the vscode.l10n.t function. If available, this function retrieves the translated string from the corresponding bundle.l10n.<LANG>.json file. You can use placeholders (e.g., {0}, {name}) in your strings to dynamically substitute values at runtime.
As an example, I will use the following string:
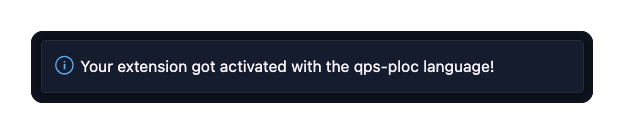
vscode.window.showInformationMessage(`Your extension got activated with the ${vscode.env.language} language!`);{{< blockquote type="info" text="vscode.env.language returns the current loaded locale.
This line returns the following notification:
To localize the string, we only need to wrap it with the vscode.l10n.t function.
import * as vscode from 'vscode';
const localizedString = vscode.l10n.t('Your extension got activated with the {0} language!', vscode.env.language);Once you have created these localization changes, you can run the following command in your terminal:
npx @vscode/l10n-dev export -o ./l10n ./srcThe command creates a bundle.l10n.json file in the ./l10n folder. This file contains all the strings that need translation. For the above sample, it has the following content:
{ "Your extension got activated with the {0} language!": "Your extension got activated with the {0} language!"}Now there are still two things to do. First, add the l10n property with the directory reference in the package.json file.
{ "l10n": "./l10n"}The second thing is to start adding your localizations; you need to add a bundle.l10n.<locale>.json file in the l10n folder.
{ "Your extension got activated with the {0} language!": "Yₒᵤᵣ ₑₓₜₑₙₛᵢₒₙ 𝓰ₒₜ ₐ𝒸ₜᵢᵥₐₜₑ𝒹 𝓌ᵢₜₕ ₜₕₑ {0} ₗₐₙ𝓰ᵤₐ𝓰ₑ!"}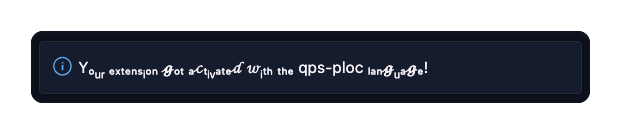
The code for this sample can be found on GitHub.
In the following article, I will explore how you can localize your webviews.
Related articles
Localization of Webviews in Visual Studio Code Extensions
Discover the process of localizing webviews in Visual Studio Code extensions. Learn how to provide multilingual support for your webview experiences.
Publishing web projects from Visual Studio Code to Azure with Git
Using the SFPx library component for simplifying the localization experience
Report issues or make changes on GitHub
Found a typo or issue in this article? Visit the GitHub repository to make changes or submit a bug report.
Comments

Let's build together
Manage content in VS Code
Present from VS Code