Creating your own dataset for AngularJS display templates – Part 2
This post is over a year old, some of this information may be out of date.
In my previous post, I showed how to include AngularJS to your display templates. In this part I will talk about how to extend the templates so that the document icon and “line 2” property (which is not provided by default) can be added. To provide these new values (icon and line 2) to your template, it is best to create your own dataset.
Creating our own dataset
To create our own dataset, we will loop over the results that were retrieved from the search query.
$scope.ResultRows = [];angular.forEach(ctx.ListData.ResultTables[0].ResultRows, function(row) { // Modify the data});As you can see in the code I pass through the current row to process. This is needed in order be able to use the $getItemValue function which can retrieve the managed property by the slot name defined in the ManagedPropertyMapping property.
The complete code block for this looks like this:
angular.forEach(ctx.ListData.ResultTables[0].ResultRows, function(row) { // Set the display template property mappings ctx['DisplayTemplateData'] = new Object(); ctx['DisplayTemplateData']['ManagedPropertyMapping'] = this.DisplayTemplateData.ManagedPropertyMapping; ctx['CurrentItem'] = row;
var item = []; item.Path = $getItemValue(ctx, "Link URL"); item.Line1 = $getItemValue(ctx, "Line 1"); item.Line2 = $getItemValue(ctx, "Line 2"); item.DocIcon = Srch.ContentBySearch.getIconSourceFromItem(row); $scope.ResultRows.push(item);});The $getItemValue function uses the current item and the ManagedPropertyMapping data to retrieve the value for the referenced managed property.
Note: this.DisplayTemplateData.ManagedPropertyMapping is automatically created in the item display template and contains the property mappings that are configured in the CSWP.
Updating the template
Now that the new dataset has been created with your additional information, you could add these values to the template in the control display template.
The whole template now looks like this:
<div ng-controller="DisplayControl" id="_#= elementId =#_" style="display:none;"> <ul class="cbs-List"> <li ng-show="ResultRows.length" ng-repeat="ResultRow in ResultRows"> <div class="cbs-Item"> <a class="cbs-ItemLink" title="{{ ResultRow.Line1.value }}"> <img class="cbs-Thumbnail" ng-src="{{ ResultRow.DocIcon }}" alt="{{ ResultRow.Line1.value }}" /> </a> <a class="cbs-Line1Link" href="{{ ResultRow.Path.value }}" title="{{ ResultRow.Line1.value }}">{{ ResultRow.Line1.value }}</a> <div ng-show="!ResultRow.Line2.isEmpty" class="cbs-Line2" title="{{ ResultRow.Line2.value }}">{{ ResultRow.Line2.value }}</div> </div> </li> <li ng-show="!ResultRows.length"> _#= Srch.ContentBySearch.getControlTemplateEncodedNoResultsMessage(ctx.ClientControl) =#_ </li> </ul></div>As you can see, you can also use the properties that have been added by the $getItemValue function. Like for instance to check if a value is empty in combination with the ngShow or ngHide directives to show or hide an element.
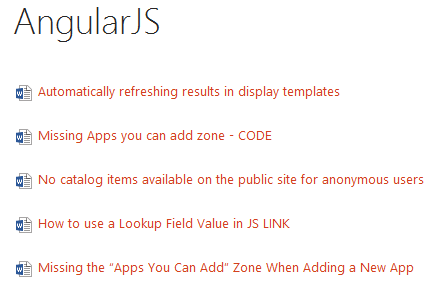
The new template results in the following output:

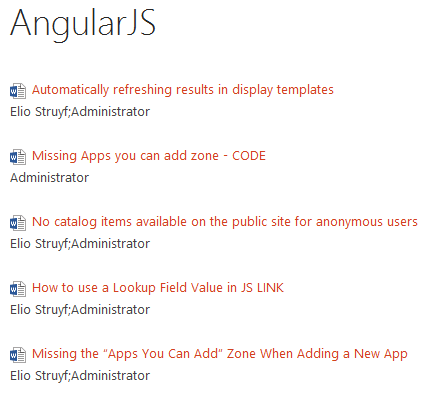
With a second line mapping set, the result looks like this:

Download
The templates for this post can be downloaded here: AngularJS Templates (CSWP).
What’s next?
In the next part I will show how you could almost eliminate the item display template, so that everything could be done from within the control display template.
Related articles
How to add AngularJS to your display templates (CSWP) – part 1
Moving all your AngularJS code to the control display template – part 3
Adding some AngularJS magic to your display templates – part 4
Report issues or make changes on GitHub
Found a typo or issue in this article? Visit the GitHub repository to make changes or submit a bug report.
Comments
Let's build together
Manage content in VS Code
Present from VS Code
Engage with your audience throughout the event lifecycle
