Uploading images to your OneDrive with PowerApps
This post is over a year old, some of this information may be out of date.
Since my last post, I got a couple of questions about uploading files to OneDrive or SharePoint. Last week I worked on a solution to find out how it “could” work(s). The only solution I found is not so elegant and it only works for OneDrive at the moment. There is no solution yet for SharePoint.
The reason why the upload to OneDrive is not so elegant, is because it involves using an Excel file. At this moment, making a connection to OneDrive can only be done via an Excel file. So, I had to find a way to link images in Excel files. Part of the solution has been written by the PowerApps team themselves.
Info: Adding images to Excel - https://powerapps.microsoft.com/en-us/tutorials/add-images-to-excel/
Still I had to find a way to upload images to OneDrive, so I thought.
How I achieved it
Step 1
First you need to create a new Excel file with a table. One of your headers needs to have a name like Picture[image]. The important part of the name is [image]. The prefix does not matter.

One you have such a file, upload it to a folder in your OneDrive.
Step 2
In PowerApps make a OneDrive for Business connection to the Excel file you uploaded.
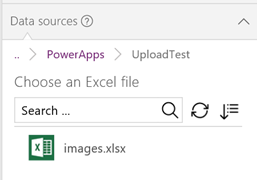

Once connected, you can start implementing your logic.
Step 3
Add a camera control or add image media control to your app. For this test, I choose the add image media control. You also need a button to start the upload process, and if you want, you can also add a gallery to show the uploaded images.

If you added the gallery, configure the AllItems property to make use of your Excel table connection:

Step 4
Now it is time to add the upload functionality. For the “upload” functionality, you should make use of the patch function.
Info: More info about the Patch function - https://powerapps.microsoft.com/en-us/tutorials/function-patch/
In the OnSelect property of the button, add the following: Patch(Table1, Defaults(Table1), {Picture
.Media})
Info: If you are using the camera control, you should add write Camera1.Photo (and have configured the take picture functionality) instead of AddMediaButton1.Media.
You can also reload the gallery when this action is done by adding Refresh(Table1) to the OnSelect property of the button.

Result
Once you have implemented this configuration, it is time to test it out. First select an image and click on the upload button, once the image is uploaded, you should see the gallery update.


If you go to your OneDrive folder, you should now see a new folder which contains your images:

Things you need to be aware of
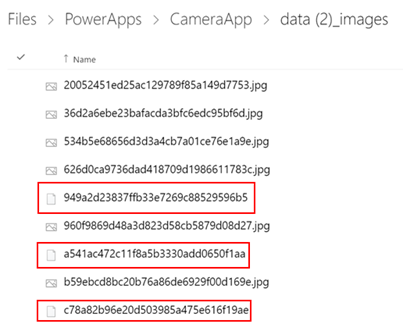
This functionality is not yet production ready. What I noticed is when you upload media files, like how I approached it in this article, the images are stored as a blob without a file extension.
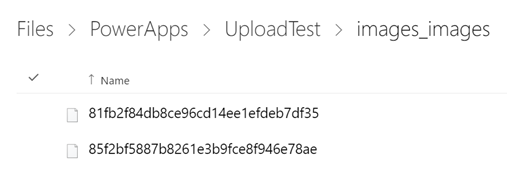
When you download the blob, and add the file extension, you will see that the file is valid. When you test it via the camera functionality. This behaviour is similar. Although depending on which device you test your application, it can be that for some the file extension gets correctly added.
What with SharePoint?
Now, you can only create connections to SharePoint lists. You cannot do it for document libraries.
Another option, which is mentioned in the forums, is to make use of Flow in your PowerApp. I tried this approach, but there are still problems when passing the file its contents.
Related articles
Report issues or make changes on GitHub
Found a typo or issue in this article? Visit the GitHub repository to make changes or submit a bug report.
Comments
Let's build together
Manage content in VS Code
Present from VS Code
Engage with your audience throughout the event lifecycle
