End-to-End Test Microsoft 365 Solutions with Playwright
This post is over a year old, some of this information may be out of date.
In the past, I have written a couple of articles about end-to-end (E2E) testing your SharePoint/Microsoft Teams solutions with Cypress, Puppeteer, and Playwright. I was a big fan of Cypress, but I must admit that Playwright caught up and became my favorite tool for E2E testing.
For me, the most significant advantage of Cypress was the visual UI for running your tests, but the main disadvantage was its use of an iframe, which caused issues for testing SharePoint and Microsoft Teams. In these other articles, I shared how you could overcome these issues, but a couple of versions ago, Playwright added its UI mode, which is very similar to the Cypress UI but without the iframe issues. That, for me, was the main reason to switch to Playwright.
In this article, I will show you how to get started with Playwright and how to test your Microsoft 365 solutions with it.
Getting started
To get you started, I have created a GitHub repository, which can be used as a template and contains the following:
- Default Playwright test configuration
- Login script for Microsoft 365
- Sample test for a SharePoint page
- GitHub Actions workflow to run your tests
Authentication
To be able to run your tests for any of your Microsoft 365 solutions, you first need to authenticate. The easiest way in Playwright is to authenticate before running your tests. It is to use the storageState functionality. This storageState allows you to store the cookies and local storage of your browser session into a file that can be reused for your tests.
For the Microsoft 365 authentication, a login.setup.ts file has been created with the following steps:
import { test as setup } from "@playwright/test";import { AuthFile } from "../constants/AuthFile";
/** * Login to Microsoft 365 * More info: https://playwright.dev/docs/auth */setup("authenticate", async ({ page }) => { await page.goto(process.env.PAGE_URL || "");
const emailInput = page.locator("input[type=email]"); await emailInput.waitFor(); await emailInput.click(); await emailInput.fill(process.env.USERNAME || "");
await page.getByRole("button", { name: "Next" }).click();
const passwordInput = page.locator("input[type=password]"); await passwordInput.waitFor(); await passwordInput.click(); await passwordInput.fill(process.env.PASSWORD || "");
await page.locator("input[type=submit][value='Sign in']").click(); await page.locator("input[type=submit][value='Yes']").click(); await page.waitForURL(process.env.PAGE_URL || "");
await page.context().storageState({ path: AuthFile });});The login has been added as a dependency for the other tests, meaning that when you run a test, it authenticates, stores the state in the playwright/.auth/user.json file, and then runs the test.
You can check this out in the playwright.config.ts file:
export default defineConfig({ ... projects: [ { name: "setup", testMatch: /login\.setup.ts/, }, { name: "chromium", use: { ...devices["Desktop Chrome"], viewport: { width: 2560, height: 1440, }, storageState: AuthFile, // Using the auth (storage state) file }, dependencies: ["setup"], // Setup will run first }, ],});Writing some tests
With the login configuration in place, you only need to write some tests.
Here is an example:
import { test, expect, Page } from "@playwright/test";
test.describe("Page load", () => { let page: Page;
test.beforeAll(async ({ browser }) => { // Open a new page to be reused between tests page = await browser.newPage(); await page.goto(process.env.PAGE_URL || "", { waitUntil: "domcontentloaded", }); });
test.afterAll(async () => { await page.close(); });
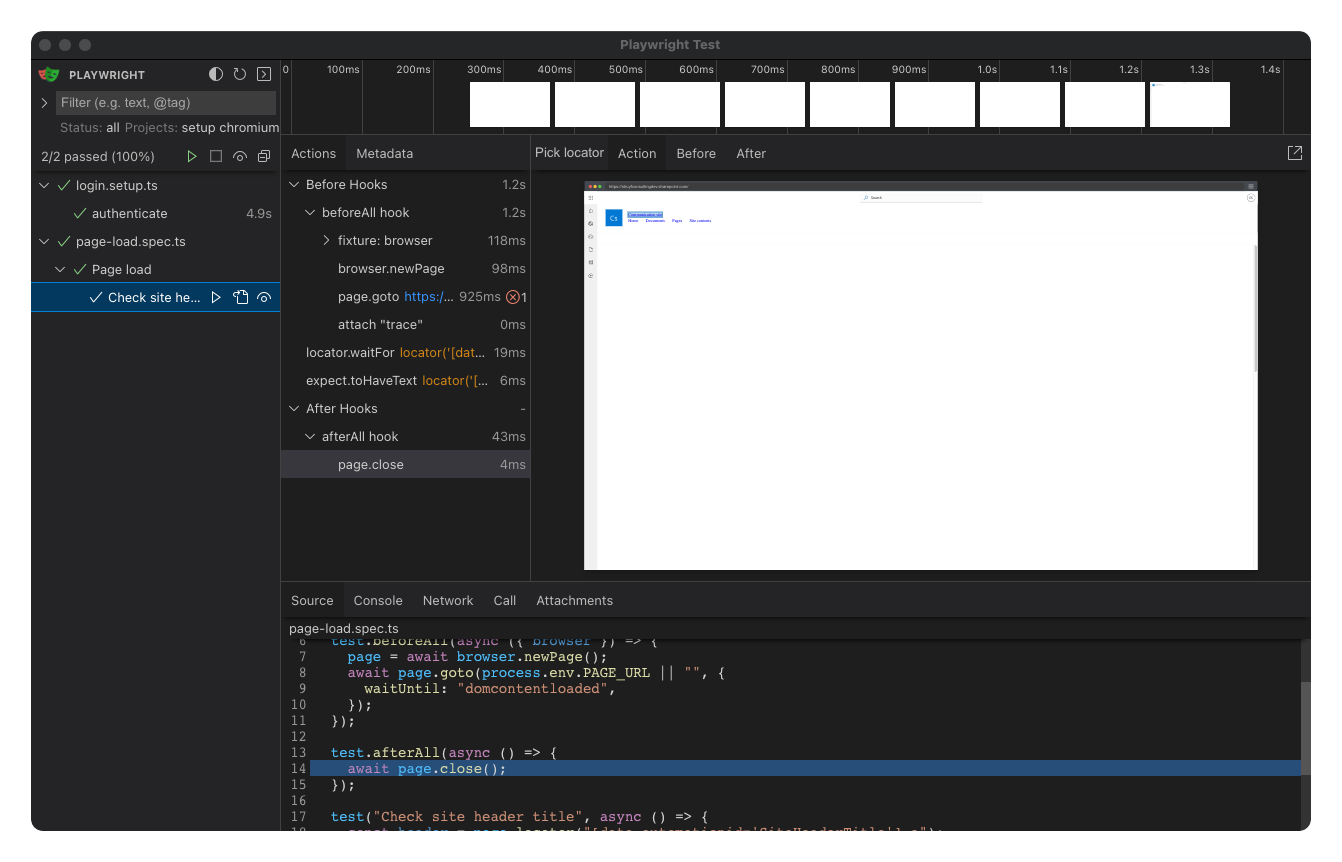
test("Check site header title", async () => { const header = page.locator("[data-automationid='SiteHeaderTitle'] a"); await header.waitFor();
await expect(header).toHaveText("Communication site"); });
test("Check screenshot", async () => { await expect(page).toHaveScreenshot(); });});In the above test, I used the logic to reuse a single page between all your tests. With this logic, the page will not be closed between each test; instead, it gets reused. It will speed up your tests SharePoint and MS Teams can be slow to load on the first time.
Out-of-the-box visual comparisons
Another great feature of the Playwright’s testing library is that it includes visual comparisons. This functionality allows you to take screenshots of your pages and compare them with previous versions. These comparisons are great for detecting visual regressions between your versions/code changes.
The result of such a visual comparison can be seen in the following screenshot:

To add a visual comparison to your test, all you need is the following code:
test("Check screenshot", async () => { await expect(page).toHaveScreenshot();});Conclusion
Playwright is an excellent tool for E2E testing your Microsoft 365 solutions. It is easy to get started with and has many great features out-of-the-box. To learn more about Playwright, check out their documentation.
Updates
2024-07-24
The Playwright M365 starter template can now be used in combination with MFA-enabled accounts. For more information check the Automating Microsoft 365 login with multi-factor authentication in Playwright tests article.
Related articles
Reporting your Playwright tests to Microsoft Teams
Learn how to easily report your Playwright test results to a Microsoft Teams channel with the help of the playwright-msteams-reporter reporter.
E2E testing in MFA environment with Playwright auth session
Easily perform E2E testing in MFA environments using Playwright's authenticated session state. Learn how to automate your tests without logging in every time.
Running Cypress on Azure DevOps for cross-browser testing your solutions
Report issues or make changes on GitHub
Found a typo or issue in this article? Visit the GitHub repository to make changes or submit a bug report.
Comments

Let's build together
Manage content in VS Code
Present from VS Code
Engage with your audience throughout the event lifecycle