Create a compose form mail add-in for Outlook with the Office Developer Tools update 2
This post is over a year old, some of this information may be out of date.
A couple of weeks ago the Office Developer Tools received its second update. These tools include the latest Office add-in project template that help you create add-ins for Excel, Word, Outlook, …
Info: The Office developer tools for Visual Studio can be found here - https://www.visualstudio.com/en-us/features/office-tools-vs.aspx
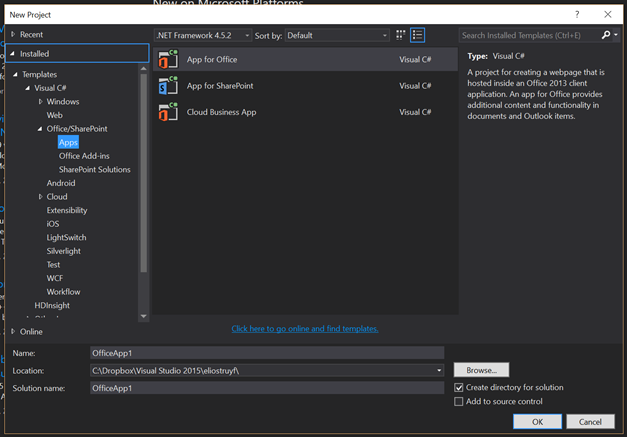
With the help of these tools, you should get up and running with Office Add-in development in no time. In fact, it was quicker in the previous version. There are a couple of things that got changed in this update. First of all, when you are going to create a new project, you will be asked which type of add-in you are going to create:

Before this update it looked as follows:
This is a good change, but let’s say if you want to create an Outlook add-in. Before you had the option to specify which type of add-in you wanted to create:
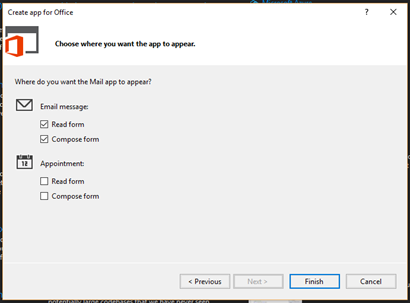
This wizard is not there anymore. The moment you create the project from the new Outlook Add-in template. It will automatically create a project with a read form add-in. You do not get the option to choose which type of add-in(s) you want to create. In my opinion, this makes things a bit tougher when you were used to what the previous version provided.
So in case, if you want to create a compose form add-in, you have to do some manual configuration to make it work.
Setting up the required files for your compose form add-in
Start by creating a new **ComposeForm **folder in your project for the compose form. This is not required, but it is cleaner to separate the forms.
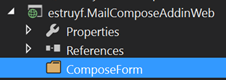
Add the following files to the ComposeForm folder:
- Form.html
- Form.css
- Form.js
Form.html
Add the following code to your HTML file:
<!DOCTYPE html><html><head> <meta charset="UTF-8" /> <meta http-equiv="X-UA-Compatible" content="IE=Edge" /> <title></title> <script src="Scripts/jquery-1.9.1.js" type="text/javascript"></script>
<!-- For the JavaScript APIs for Office, go to http://aka.ms/officejs-overview to learn more. --> <script src="https://appsforoffice.microsoft.com/lib/1/hosted/office.js" type="text/javascript"></script>
<!-- To enable offline debugging using a local reference to Office.js, use: --> <!-- <script src="Scripts/Office/MicrosoftAjax.js" type="text/javascript"></script> --> <!-- <script src="Scripts/Office/1/office.js" type="text/javascript"></script> -->
<script src="Form.js" type="text/javascript"></script>
<!-- For the Office UI Fabric, go to http://aka.ms/office-ui-fabric to learn more. --> <link rel="stylesheet" href="https://appsforoffice.microsoft.com/fabric/2.1.0/fabric.min.css" /> <link rel="stylesheet" href="https://appsforoffice.microsoft.com/fabric/2.1.0/fabric.components.min.css" />
<!-- To enable the offline use of Office UI Fabric, use: --> <!-- link rel="stylesheet" href="Content/fabric.min.css" --> <!-- link rel="stylesheet" href="Content/fabric.components.min.css" -->
<link rel="stylesheet" href="Form.css" /></head><body class="ms-font-m"> <h1>Your compose form</h1></body></html>Form.js
Add the following code to your JS file:
(function () { "use strict";
// The Office initialize function must be run each time a new page is loaded. Office.initialize = function (reason) { $(document).ready(function () { // Write some code }); };})();Configuring the compose form
Now that all the required files are in place, it is time to configure the compose form to the manifest XML file.
-
Open the manifest file; {{< caption-new “/uploads/2016/05/051016_1432_Createacomp5.png” “Open the Office add-in manifest” “data
/jpeg;base64,iVBORw0KGgoAAAANSUhEUgAAAAoAAAACCAIAAADuA9qHAAAACXBIWXMAABnWAAAZ1gEY0crtAAAARUlEQVR4nAXBUQ6AIAgAUI/kjxEDQlTaWpNW/XT/k/RewgX34URcq1lrqpVlgxVFJOecmPQbNs+I653zjnjcD9UOQKXgD863DzYQvJoDAAAAAElFTkSuQmCC” “330” “66” >}} -
Find the FormSettings element; {{< caption-new “/uploads/2016/05/051016_1432_Createacomp6.png” “ItemRead form” “data
/jpeg;base64,iVBORw0KGgoAAAANSUhEUgAAAAoAAAADCAIAAAAlXwkiAAAACXBIWXMAABnWAAAZ1gEY0crtAAAAS0lEQVR4nB3B0Q3AIAgFQCfxARWoVI31y6T779XEu3TV7nNbfcwMBx3MDCCRiM/t64vxagyP7ndVVTMTkVQ8tC0uTkQAgTgD+QDwA2nwDOgyoMWKAAAAAElFTkSuQmCC” “522” “139” >}} -
Insert the compose form element underneath the read form;
<Form xsi:type="ItemEdit"> <DesktopSettings> <SourceLocation DefaultValue="~remoteAppUrl/ComposeForm/Form.html"/> </DesktopSettings></Form>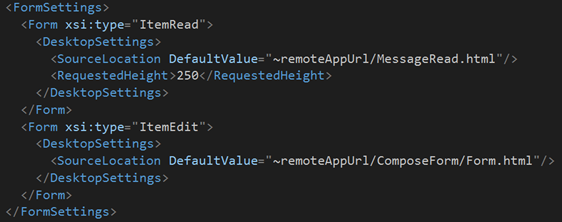
Info: If you do not want to show the read form. You can remove the ItemRead form from the FormSettings element.
- Next is to add a new rule element. Find the Rule element in the file;

- Add a new Rule element for the Edit form type;
<Rule xsi:type="ItemIs" ItemType="Message" FormType="ReadOrEdit" />
Info: If you do not want to show the read form. You can change the FormType to Edit instead.
At this point, you configured the compose form for Outlook Online and Outlook 2013. If you want to use the add-in in Outlook 2016 you will have to do a bit more configuration in order to get it working.
Outlook 2016 configuration - add-in commands
For Outlook 2016 you will have to configure an additional add-in command in order to load the task pane. The configuration for this need to be done in the same manifest file as where you did the previous changes.
Find the ExtensionPoint element in the manifest file. This is the add-in command which is defined for the read form.

Add a new ExtensionPoint element for your compose form with the following code:
<!-- Message Compose --><ExtensionPoint xsi:type="MessageComposeCommandSurface"> <OfficeTab id="TabDefault"> <Group id="msgComposeGroup"> <Label resid="groupLabel" /> <Control xsi:type="Button" id="msgComposeOpenPaneButton"> <Label resid="paneComposeButtonLabel" /> <Supertip> <Title resid="paneComposeSuperTipTitle" /> <Description resid="paneComposeSuperTipDescription" /> </Supertip> <Icon> <bt:Image size="16" resid="icon16" /> <bt:Image size="32" resid="icon32" /> <bt:Image size="80" resid="icon80" /> </Icon> <Action xsi:type="ShowTaskpane"> <SourceLocation resid="messageComposeTaskPaneUrl" /> </Action> </Control> </Group> </OfficeTab></ExtensionPoint>Info: If you do not need the read form in your add-in, you best remove the ExtensionPoint for the MessageReadCommandSurface type.
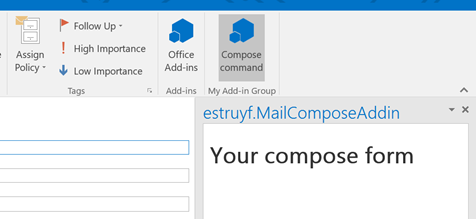
The last thing to do is creating the label variable and task pane URL. Add the following highlighted lines of code to your Resources element manifest file: lines 10, 17, 18, 22.
<Resources> <bt:Images> <bt:Image id="icon16" DefaultValue="~remoteAppUrl/Images/icon16.png"/> <bt:Image id="icon32" DefaultValue="~remoteAppUrl/Images/icon32.png"/> <bt:Image id="icon80" DefaultValue="~remoteAppUrl/Images/icon80.png"/> </bt:Images> <bt:Urls> <bt:Url id="functionFile" DefaultValue="~remoteAppUrl/Functions/FunctionFile.html"/> <bt:Url id="messageReadTaskPaneUrl" DefaultValue="~remoteAppUrl/MessageRead.html"/> <bt:Url id="messageComposeTaskPaneUrl" DefaultValue="~remoteAppUrl/ComposeForm/form.html"/> </bt:Urls> <bt:ShortStrings> <bt:String id="groupLabel" DefaultValue="My Add-in Group"/> <bt:String id="customTabLabel" DefaultValue="My Add-in Tab"/> <bt:String id="paneReadButtonLabel" DefaultValue="Display all properties"/> <bt:String id="paneReadSuperTipTitle" DefaultValue="Get all properties"/> <bt:String id="paneComposeButtonLabel" DefaultValue="Compose command"/> <bt:String id="paneComposeSuperTipTitle" DefaultValue="Compose command super tip"/> </bt:ShortStrings> <bt:LongStrings> <bt:String id="paneReadSuperTipDescription" DefaultValue="Opens a pane displaying all available properties. This is an example of a button that opens a task pane."/> <bt:String id="paneComposeSuperTipDescription" DefaultValue="Compose command super tip description."/> </bt:LongStrings></Resources>Once this is in place, you can debug the application and you will get an add-in action that opens the compose form task pane in the Outlook 2016 client.
Resources
More information about this can be found here:
- Office Add-in Commands and SharePoint 2016 Support
- Define add-in commands in your Outlook add-in manifest
Code
I have uploaded my sample project to GitHub: Outlook add-in compose sample project
Report issues or make changes on GitHub
Found a typo or issue in this article? Visit the GitHub repository to make changes or submit a bug report.
Comments

Let's build together
Manage content in VS Code
Present from VS Code